
This guide will:
- Highlight the durability, aesthetics, and long-term value of high-quality concrete pavers.
- Compare concrete pavers to other materials (stamped concrete, asphalt, natural stone, etc.) to show why they’re the best choice.
- Discuss the downsides of DIY and why hiring a pro like Ground Force Property Services, LLC is worth it.
- Include real customer stories and testimonials showcasing Ed’s high-quality work and veteran-owned craftsmanship.
- Offer a clear call to action, encouraging homeowners to contact Ground Force Property Services, LLC for expert paver installation in Onondaga and Oswego County towns.
I’ll write this in a friendly, conversational tone while keeping it informative and professional. Stay tuned!
The Ultimate Guide to Investing in Premium Concrete Pavers for Homeowners in Onondaga & Oswego County, NY
Introduction: Why Premium Concrete Pavers Are the Best Investment for Central NY Homeowners
Hello there! I’m Ed, the proud owner of Ground Force Property Services, LLC and a U.S. Army Combat Veteran. If you’re a homeowner in Onondaga County or Oswego County, NY (think Syracuse, Liverpool, Baldwinsville, Oswego, Fulton, and everywhere in between), I want to talk to you about something that can truly transform your home’s exterior: premium concrete pavers. Consider this your master guide – an informal, down-to-earth conversation about why upgrading your outdoor spaces with high-quality pavers is hands-down one of the best investments you can make in Central New York.
Why am I so confident about concrete pavers? Well, I’ve seen it all. After years of military service, I returned home to Central NY and applied the same dedication and attention to detail from my Army days to helping homeowners create beautiful, resilient outdoor spaces. Over time, I’ve lost count of how many driveways, patios, porches, and walkways we’ve upgraded with pavers. One thing is certain: premium concrete pavers are game-changers for any property around here. Whether you found this guide by searching for “best paver contractors in Onondaga County” or “patio paver installation near Oswego NY,” you’re in the right place and about to discover why so many of your neighbors are choosing pavers for their homes.
In this guide, we’ll cover everything from the benefits of concrete pavers (like durability, beauty, and low maintenance) to why professional installation is crucial (and the pitfalls of DIY attempts). We’ll compare pavers to other materials like stamped concrete, asphalt, and natural stone, so you can see how pavers stack up. I’ll also share some customer success stories from right here in Onondaga and Oswego counties – real examples of how a paver project can elevate a home’s look and value. And since you might be wondering what it’s like to work with Ground Force Property Services, I’ll walk you through our process from the first call to the final result. By the end, you’ll understand why investing in premium concrete pavers for your entryway, backyard patio, porch, sidewalk, pool deck, or custom fire pit is a decision you’ll never regret.
So grab a cup of coffee (or maybe a nice cold drink if it’s summer in Syracuse!), sit back, and let’s dive in. I’m excited to show you how something as unassuming as a paving stone can dramatically enhance your home – and why doing it with the right materials and the right team (that’s us!) makes all the difference. Let’s start with the big picture: the key benefits of choosing concrete pavers for your Central New York home.
The Benefits of Concrete Pavers
You might be asking, “Ed, what makes concrete pavers so special? Aren’t they just fancy bricks on the ground?” Oh, they’re much more than that! Premium concrete pavers bring a host of benefits that other paving materials just can’t match. In this section, we’ll explore why these pavers are such a smart choice for homeowners in our area. From rugged durability that stands up to Syracuse snowstorms to the eye-catching beauty that boosts curb appeal in Baldwinsville, pavers pack a one-two punch of strength and style. They’re also refreshingly low maintenance, safe underfoot (even when it’s icy!), highly customizable, and can even be eco-friendly with permeable designs.
Let’s break down each of these advantages one by one:
Durability and Longevity
In Central New York, we ask a lot of our outdoor surfaces. Think about it – we go from hot summers to bitterly cold, snowy winters. Your walkways and patios must endure blazing sun, heavy rain, lake-effect snow, and constant freeze-thaw cycles. It’s a tough life for a patio in Oswego or a driveway in Syracuse! This is where the exceptional durability of concrete pavers shines through.
Premium concrete pavers are built to last decades, even in harsh climates like ours (All About Concrete Pavers – This Old House). In fact, when installed correctly (with a proper base and grading), pavers can handle extreme temperature swings and heavy loads without cracking. Unlike a poured concrete slab that might split when the ground freezes and shifts, interlocking pavers have natural joints that allow for a bit of flex. This means they’re less prone to cracking from ground movement or freeze-thaw cycles (All About Concrete Pavers – This Old House). I’ve seen paver driveways in Syracuse that look as good as new after 20+ years, whereas a standard concrete driveway would likely be full of cracks by then.
To give you an idea of just how tough these pavers are: many manufacturers offer lifetime structural warranties on their interlocking concrete pavers. They’re often made with very high strength concrete (far stronger than typical home foundation concrete), so they can support the weight of cars and even heavy trucks if you decide to use them for a driveway. And for patios and walkways, they easily bear foot traffic, grill stations, furniture, and the occasional friendly dance party without breaking a sweat.
I like to tell my clients: pavers are a “buy it for life” kind of product. Invest once and enjoy for decades. There’s historical proof too – just look at old European streets paved with stones or bricks; many of those are still in use hundreds of years later. Modern concrete pavers are engineered to similar longevity. One study from HomeLight even found that a well-built paver patio can offer over a 100% return on investment when you sell your home ( Why Pavers Increase Your Property Value : ), partly because buyers know pavers last so long. In some cases, paver installations (especially using natural stone or high-end concrete pavers) have been noted to last up to a century ( Why Pavers Increase Your Property Value : ) with proper care. Now, I’m not saying your new patio will last 100 years (at least, I might not be around to see that!), but it shows how long-lasting this investment can be.
Durability isn’t just about withstanding weight and weather; it’s also about looking great year after year. Good pavers won’t spall or deteriorate from ice and road salt the way plain concrete can. Here in Central NY, we have to salt our walkways and driveways in winter. Lesser materials can pit or crumble from that. High-quality concrete pavers are made to be freeze-thaw resistant and salt-tolerant, meaning they won’t flake or peel due to winter treatment. If you’ve ever chipped away ice on a concrete stoop and ended up chipping the concrete itself, you’ll appreciate that pavers don’t have that issue.
Lastly, if somehow a single paver does get damaged (say you dropped a really heavy sharp object on it, or a plow scraped it wrong), the beauty is you can replace one paver without messing up the whole surface. I’ll talk more about easy repairs later, but from a longevity standpoint, this means the system of pavers can essentially last indefinitely. You’re not staring at an irreparable crack – you swap out one unit and it’s like new again. This is a huge advantage over continuous surfaces like concrete or asphalt.
Bottom line: Premium concrete pavers are incredibly durable and long-lasting, perfectly suited for the tough conditions in Onondaga and Oswego counties. When we install pavers at Ground Force, we build them to endure: a solid base, top-grade pavers, and expert finishing ensure your investment will stand the test of time. You’ll be enjoying that beautiful patio or sturdy front walkway not just next summer, but for countless seasons to come.
Aesthetic Appeal and Curb Appeal
Let’s face it – looks matter, especially when it comes to your home. You want that “wow” factor when guests pull up to your house in Liverpool or when you’re relaxing on your back patio in Fulton. One of the greatest things about concrete pavers is how beautiful and versatile they are. In my experience, few other landscaping investments can boost your home’s aesthetic appeal and curb appeal as quickly and effectively as a well-designed paver installation.
First off, the variety of styles available is staggering. Concrete pavers come in an extensive range of colors, shapes, sizes, and textures (All About Concrete Pavers – This Old House). You can get pavers that mimic the look of natural stone, pavers that have a clean modern rectangular shape, or even ones that look like clay bricks or old cobblestones. Whether your home in Syracuse has a classic colonial vibe or your camp out near Lake Ontario has a rustic cottage feel, there are pavers to match any architectural style. From earthy tones that blend with the landscape to rich charcoals and tans that complement contemporary designs – the sky’s the limit.
As a designer/installer, I love helping homeowners pick out the perfect paver style. We often create custom patterns and layouts to make the project unique. With pavers, you can play with laying patterns like herringbone, basket weave, or a running bond pattern. You can incorporate decorative borders in contrasting colors to frame a patio or outline a walkway. We’ve done patios with circle kits to create a focal point under a fire pit, and driveways with a different color border that makes them pop. This level of design detail simply isn’t possible with plain poured concrete or asphalt – those give you a flat slab, maybe you can stain it, but you won’t get the dimensional pattern look that pavers offer.
Think about your curb appeal – the first impression people get when they see your home. Replacing a drab, cracked concrete front walk with a charming paver walkway and stone steps can transform the entrance. Suddenly, your home goes from “okay” to “stunning.” I’ve had customers tell me that after we installed a paver entryway, neighbors slowed down to compliment them or even left notes asking who did the work! Great curb appeal not only makes you proud every time you come home, but it can also increase your property value. Attractive landscaping and hardscaping can make a big difference if you ever decide to sell. A clean, well-designed paver driveway or front path sets a welcoming tone before people even step inside. It signals that the property is well cared for and up-to-date.
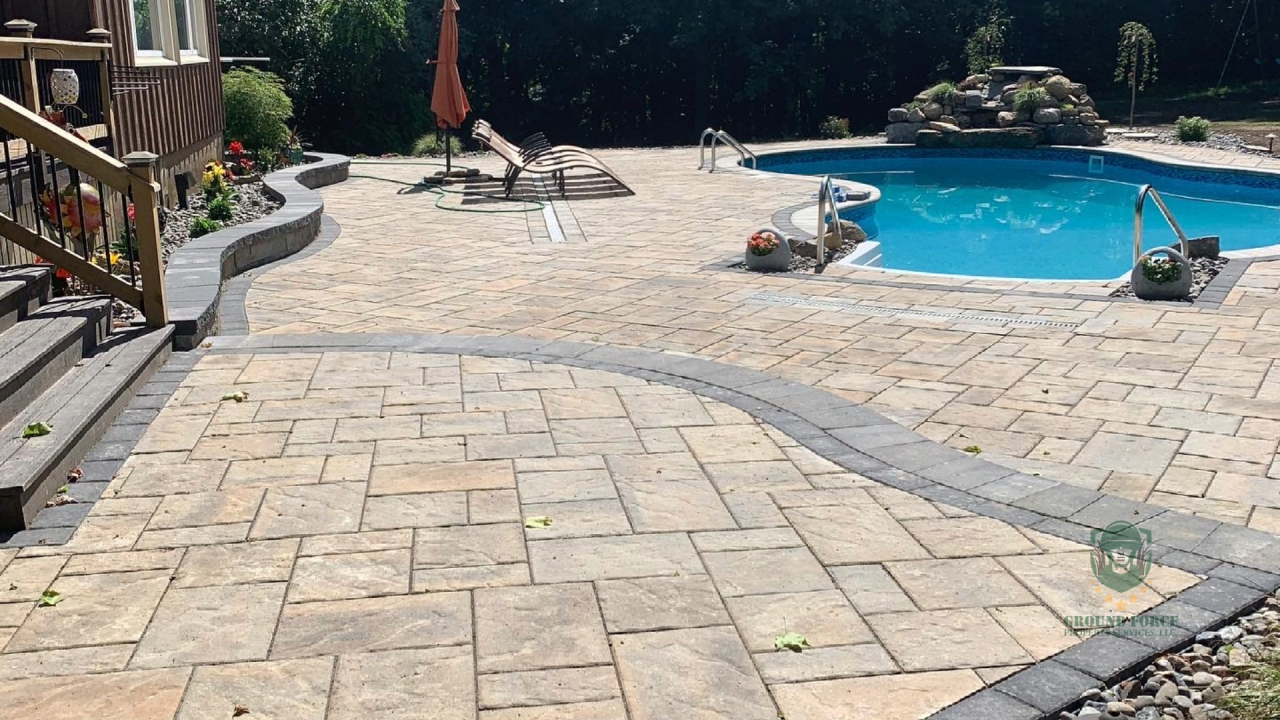
Aesthetic appeal isn’t just for the front of the house either. In backyards across Onondaga and Oswego counties, we’ve turned bland grass or old decks into magazine-worthy outdoor living spaces using pavers. Picture a spacious paver patio with a built-in seat wall and maybe an attached custom fire pit made of matching paver blocks. Add some comfortable outdoor furniture, and you’ve got an instant extension of your home – an outdoor living room, if you will. Because pavers come in so many styles, you can achieve any look: rustic charm with tumbled stone-like pavers, a sleek modern entertaining area with large-format pavers, or perhaps a quaint garden patio with a cobblestone feel. We’ve done pool decks in light-colored pavers that look bright and resort-like, and walkways with natural curves and differing paver sizes for a garden path aesthetic. The design flexibility is unparalleled.
One more thing I love about pavers: they maintain their beauty over time with minimal effort. Unlike concrete that can develop stains or surface discoloration, the color in concrete pavers is integrated during manufacturing (often throughout the mix or at least in a thick wear layer). This means the color doesn’t flake off like a surface paint might. High-quality pavers will keep their color for the long haul – and if a little fading does occur after, say, 15-20 years, it’s usually uniform and can often be revived with a sealer. In any case, they’ll never suddenly look as bad as a cracked slab or crumbling asphalt. The visual appeal of pavers is long-lasting, and that’s a big benefit.
To sum up: if you want to elevate the look of your home and make your outdoor spaces more inviting, you can’t go wrong with concrete pavers. They add texture, color, and architectural interest that plain surfaces just can’t match. Trust me, I’ve seen homeowners literally grin from ear to ear when they see their finished patio or driveway in pavers – it’s that dramatic of an upgrade. In Central NY where everyone’s houses endure the same weather, a beautiful paver feature is a surefire way to make your home stand out on the block.
Low Maintenance Convenience
Now, I know what you might be thinking: “This all sounds great, Ed, but I don’t want something high-maintenance. I’ve already got enough chores around the house!” Believe me, I hear you. One of the best perks of premium concrete pavers is how low maintenance they are compared to other options. As a busy homeowner (and as someone who maintains a lot of these installations for clients), I appreciate that pavers don’t demand much attention to keep them looking and performing great.
Unlike a wooden deck that needs regular staining or an asphalt driveway that you have to reseal every other year, concrete pavers are pretty self-sufficient. Here’s what typical upkeep looks like for a paver patio or walkway in Onondaga or Oswego County:
- Regular Cleaning: Just sweep or hose off the area occasionally to remove leaves, dirt, or debris. The modular nature of pavers actually hides minor dirt well, since it falls into the textured surface or joints until you clean it. If you want to give it a spring refresh, a light power wash does wonders (on a gentle setting so you don’t blast out the joint sand). There’s no need for scrubbing or special treatments most of the time – a little water and maybe a mild detergent for a spill is enough.
- No Annual Sealing Required: Unlike asphalt which turns gray and brittle if not sealed, or stamped concrete which many people choose to seal to protect the color, concrete pavers do not require sealing to maintain their structural integrity. They come out of the factory cured and strong, and the color is baked in. You can choose to seal pavers if you want to enrich the color or add a slight sheen, but that’s optional and usually only every 3-5 years (All About Concrete Pavers – This Old House), not yearly. Many homeowners skip it entirely and the pavers still last and look fine.
- Weed and Moss Control: A common question is, “Will weeds grow between my pavers?” If installed properly with polymeric sand in the joints, weed growth is very minimal. Polymeric sand is a special sand that hardens slightly when moistened, which helps lock pavers in place and prevents weeds from taking root easily. In shady or damp areas you might get the occasional bit of moss or a weed seed that blows into a joint, but it’s not like having to constantly weed a garden; a quick pluck or a spritz of weed killer now and then will handle it. Regular sweeping also prevents soil from accumulating in joints which deters weed growth (All About Concrete Pavers – This Old House). From my experience, clients are pleasantly surprised at how little weeds are an issue with pavers compared to, say, an old brick patio with wide gaps, or cracked concrete where weeds sprout from the cracks.
- No Big Cracks to Fix: Because pavers resist cracking by design (each unit moves slightly rather than the surface cracking), you won’t be doing the typical crack-patching that concrete or asphalt needs. If you’ve ever tried to patch a crack in a concrete driveway, you know it’s a losing battle – it never looks great and cracks tend to reappear or multiply. With pavers, you just don’t face that problem. Over many years, a paver might get a hairline crack, but again, you can swap out an individual paver if it bothers you (more on that in a second). The flexible joints also mean pavers can survive frost heave and settle back down, whereas a big slab might heave and stay uneven.
- Easy Repairs: I keep mentioning how you can replace a single paver – let me emphasize how huge this is for maintenance. If one paver in your patio gets a permanent stain or chips, you can have that one piece popped out and a new one put in its place. It’s a quick fix that leaves the surface looking perfect again. Compare that to repairing other surfaces: a stained stamped concrete slab might require painting or recoating the whole thing; a cracked slab might need cutting out a section and re-pouring (leaving an ugly patch line); a rotten deck board replacement is doable but then you often have to re-stain to blend it. Pavers make repairs painless and inexpensive (All About Concrete Pavers – This Old House). In many cases, homeowners might not need a professional at all for a simple replacement – I’ve walked handy clients through pulling up a paver and replacing it themselves in 10 minutes. And if it’s a larger area repair (say you had to run a new utility line underground), a pro can lift and re-lay pavers with minimal new materials needed. It’s like the surface was never disturbed.
- Resistant to Stains and Fading: Quality concrete pavers are made to resist staining. They’re dense and often have additives that make them less porous. Of course, if you leave oil or rust sitting long enough you can get a spot, but generally, spills (BBQ grease, red wine, etc.) can be cleaned if addressed within a reasonable time. If you do get a stain, there are cleaners that work on pavers, or as a last resort, flip the paver over or swap it out. As for fading, many pavers are UV-resistant and will only have slight color changes over a very long period. They actually often fade more evenly than natural materials. And as mentioned, a sealer can always be applied down the line to brighten them up. So unlike wood that grays out or needs painting, pavers keep their color and finish with minimal effort.
In short, a paver patio or driveway is about as close to “set it and forget it” as you can get in the world of hardscaping. Here’s a quick scenario: One of our clients in Clay, NY had us install a paver pool deck about 5 years ago. I recently checked in with him to ask how it’s holding up. His reply: “Honestly, I haven’t done much to it at all, and it still looks awesome. I spray it down in spring and maybe pull a weed or two in the summer, that’s it.” That pretty much sums it up! He’s spending his time enjoying the pool and patio, not maintaining them.
As a homeowner myself, I’m a fan of anything that gives me more time to relax and less time doing upkeep. Premium concrete pavers definitely fit that bill. A little easy maintenance now and then, and they’ll reward you with long-lasting beauty and function. And if you do choose to have Ground Force Property Services handle periodic maintenance (we offer services like power washing, joint sand refill, etc.), we’re only touching things up infrequently – not constantly fixing problems. So, if you’re looking for an improvement that improves your life by not adding a ton of chores, pavers are the way to go.
Safety and Slip Resistance
Safety might not be the first thing that comes to mind when thinking about patios or walkways, but it’s actually a huge consideration, especially for us here in Upstate New York. With our wet leaves in the fall, snowy/icy winters, and even splashy pool parties in the summer, you want to make sure that the surfaces you, your family, and guests walk on are safe and slip-resistant. The good news is, concrete pavers excel in this area too.
Have you ever stepped onto an old concrete porch in January that’s slick with ice? Or maybe a wooden deck after a rain, where you nearly did the splits? It’s not fun. One big advantage of pavers is the improved traction they offer. Concrete pavers generally have textured surfaces and joint lines between each paver, which provide grip underfoot. Even when wet, a textured paver has some bite to it. Many pavers are designed with a slightly rough or non-skid finish specifically so they perform well around pools and in rainy/snowy conditions. In fact, industry experts note that pavers provide better traction than smooth poured concrete, especially on sloped surfaces (All About Concrete Pavers – This Old House). Those little bevels and gaps between the stones aren’t just decorative – they can help channel water and give your shoe something to “catch” on instead of hydroplaning on a flat slab.
For pool decks, safety is paramount. When we design a paver pool deck for a client in, say, Oswego or Cicero, we often choose pavers that are branded as pool-safe, meaning they have a cooler surface (lighter colors) and a slip-resistant texture. Kids can hop in and out of the pool without you worrying that they’ll skid on a slick surface. Compared to glazed tiles or even some stamped concrete finishes, pavers are a much smarter choice around water because they’re less slippery. Plus, if you opt for permeable pavers (more on those soon), the water drains right through the joints instead of pooling on top, which practically eliminates standing puddles that could cause slips.
Winter safety is another big one. A huge fear for many homeowners (especially as we get older or have older relatives around) is slipping on ice. Now, pavers by themselves won’t stop ice from forming if conditions create it, but the way a paver surface is constructed can help in several ways. First, the color and material of pavers can sometimes cause snow to melt a hair faster than plain concrete (particularly darker pavers that absorb a touch more sunlight). More importantly, the modular nature of pavers means you often get a bit better drainage – as mentioned, water can seep down instead of sitting flat. This can reduce the sheet-ice effect you sometimes see on large flat concrete slabs. I’ve observed that my paver driveway at home tends to have less icy buildup than my neighbors’ concrete drive; water finds its way into the seams rather than glazing the whole top. And when there is snow and ice, pavers handle de-icing salts well, so you can salt the area for safety without worrying about ruining the surface.
Another safety plus: no big cracks or upheaved slabs. Cracks in concrete aren’t just ugly; they can be trip hazards. Uneven sections (from tree roots pushing up or frost heave) can catch toes and cause falls. Pavers might settle a bit uniformly over a long time, but you won’t usually get a sudden 2-inch lip like you can with a broken concrete corner. If a paver ever did shift oddly, you could fix that one spot. So the walking surface remains relatively even and safe to traverse. This is particularly important for walkways. If you have a front sidewalk or garden path, you want every step to be solid and level. We always install pavers with a good base and edge restraints so they stay put and keep your path safe.
One more aspect of safety: fire safety for those custom fire pits and outdoor kitchens. Concrete pavers (and the wall blocks often used for fire pit surrounds) are non-combustible. So if a spark flies out of your fire pit, it’s landing on stone, not on wood decking or mulch. That can give you peace of mind while enjoying a bonfire on a cool autumn night in Lafayette or Central Square. Also, since pavers aren’t affected by heat in the way asphalt would be (asphalt can soften or even melt near high heat), they’re a durable choice for the area around a fire feature or a BBQ grill station.
In summary, premium concrete pavers contribute to a safer outdoor environment at your home. They help provide sure footing in wet or icy conditions, support the use of de-icers without damage, and avoid the pitfalls of cracks or uneven surfaces that other materials suffer from. Living in Central NY means dealing with lots of water – frozen or otherwise – and pavers are truly up to the task. It’s a great feeling not having to tip-toe gingerly down your front steps in February or worry about the kids wiping out on the pool deck. Safety may not be the flashiest benefit of pavers, but it’s one of those practical, everyday advantages that you’ll be thankful for over and over.
Customization Options (Colors, Textures, Patterns, Borders, and More)
When you invest in a home improvement, you want it to reflect your personal style and suit your needs, right? One of my favorite things about working with concrete pavers is the endless customization options we can offer to homeowners. Whether you have a specific vision (like a patio that matches the stone on your house) or you need some creative ideas, pavers are like the ultimate artist’s palette for your outdoor canvas. No two paver projects we do are exactly alike – and that’s the fun of it!
Colors: Let’s start with color. Concrete pavers are available in just about any color you can imagine for a stone product. Do you like warm, earthy tones (browns, reds, ochres)? We’ve got you covered. Prefer cool grays, charcoals, and slate tones? Plenty of those too. Multi-color blends are popular as well – for example, a mix of tan and gray in the same paver can complement multiple elements in your yard. We often help Syracuse-area homeowners choose paver colors that tie in with their house siding or brick. Got a red brick home in Fayetteville? Maybe a paver with a blend of charcoal and burgundy will pull the look together. Is your house a modern gray in Brewerton? Perhaps a mix of light and dark grays for a sleek monochromatic scheme. And unlike paint, the color of pavers doesn’t peel off; it’s locked in, so what you choose is what you’ll enjoy for years. Some people even get creative and use different color pavers within the same project to create patterns (like a checkerboard effect or a border in a contrasting hue).
Textures: Next up, texture. Pavers come in different surface textures that can dramatically change the appearance. Some popular textures include: smooth (for a clean modern look), slightly dimpled or mottled (for a natural stone imitation), tumbled (edges are worn to look like old rustic cobblestones), and even exposed aggregate (where you see little stones on the surface for a unique look). If you’re aiming for that Old World European patio vibe in your backyard in Oswego, a tumbled cobble-style paver gives instant character, like it’s been there for ages. For a chic, contemporary porch in Manlius, a large-format smooth paver with crisp edges might be the ticket. We also have pavers stamped with textures that resemble slate, flagstone, or wood grain – these are great when you want a natural material look but with the benefits of concrete. Mixing textures is an option too; for example, using a different texture for a border can subtly delineate that frame.
Patterns & Layouts: This is where things get really exciting. How we lay the pavers can form beautiful patterns. Here are a few common patterns we often discuss with clients:
- Herringbone: pavers laid at a 45 or 90 degree angle in a zigzag pattern. This pattern is excellent for driveways or high-traffic areas because the interlocking is very strong, and it has a dynamic look.
- Running Bond: like a traditional brick wall pattern, where each row is offset. Simple and classic, great for paths or patios, and visually elongates areas (imagine a running bond pattern leading down a long walkway in Skaneateles, drawing you toward the lake view).
- Basket Weave: pairs of pavers alternately oriented, creating a woven look. Charming for smaller patios or old-fashioned style homes – it can lend a colonial feel that suits historic homes.
- Random/Asymmetric: some pavers come in multiple sizes that you can lay in a repeating random pattern, mimicking natural flagstone layouts. This gives a relaxed, organic look that’s perfect for garden patios.
- Circular or Fan Patterns: using special kits or sizes to create circle designs or fan shapes. These make fantastic focal points – for instance, a custom fire pit might sit at the center of a circular paver pattern, creating a “sunburst” effect around the fire.
We can also incorporate insets or mosaics – perhaps a different color paver or even a custom engraving for something personal (like a compass rose design embedded in a patio, or your family initial letter formed in contrasting brick – yes, we’ve done that!).
Borders and Accents: A simple way to customize is by adding a border course of pavers around the edge of a patio or driveway. This could be one row of a different color or style to frame the space. For example, a tan patio with a dark brown border looks very sharp and “finished.” We can double the border for more pop, or do a soldier course (pavers laid end-to-end) vs. a sailor course (laid long side along the edge) for different aesthetics. Accents like a diagonal stripe of darker pavers cutting across a driveway, or a few randomly placed contrasting stones in a walkway, can also be eye-catching. It’s these little touches that make your project uniquely yours.
Shape and Size: Pavers aren’t one-size-fits-all. We have small brick-like pavers, large slabs (2’x2’ or bigger) that look very modern, and everything in between. Sometimes we combine sizes for visual interest. A mix of small and medium pavers can give a cobbled look; mixing medium and large can feel like European courtyard paving. If you have a small area, smaller pavers can make it feel larger (more units to catch the eye), whereas in a huge patio, larger pavers can scale better. We custom tailor that to your space.
Integration with Other Features: Customization also means integrating your paver area with the rest of your yard seamlessly. At Ground Force, we often design matching steps, retaining walls, or fire pit structures using block systems that complement the pavers. For example, if your front walkway is pavers, we might build the front steps from the same paver material (many paver product lines have accompanying wall blocks or step treads). That way, everything looks cohesive. If you want a sitting wall around your patio or pillars at the end of your driveway, we can use materials that blend with your pavers for a unified design. Lighting is another customizable feature – we can insert LED lights into paver pathways or along edges for a gorgeous nighttime ambiance (and added safety). These little integrated lights shining on a paver walkway in your Camillus backyard can look like a landing strip guiding you through your garden at night!
In a nutshell, with concrete pavers you get to call the shots on design. Color, texture, pattern, shape – you can customize it all to reflect your taste and complement your home. I always encourage homeowners to gather inspiration: maybe drive around Syracuse or Oswego to spot designs you like, or show me Pinterest/Houzz photos that catch your eye. With our expertise and the versatility of pavers, we can often bring those dreams to life in your own yard. It’s very much a collaborative and creative process. And don’t worry if you’re not sure what you want – I’m here to guide you. I’ve had customers start with “I just know I hate my old cracked patio” and end with “Wow, I never knew it could look like this, it’s perfect!” thanks to discovering the possibilities during our consultation. So dream big – pavers can likely make it happen.
Environmentally Friendly Options (Permeable Pavers for Drainage)
Sustainability and smart environmental practices are increasingly important to many homeowners (and to me, too). If you’re looking to invest in your property in a way that’s also environmentally conscious, concrete pavers have some great options for you. In particular, I want to highlight permeable pavers – a special type of paver system that can help with drainage and reduce your environmental footprint.
First, let’s talk drainage. We get our fair share of rain in Central NY, and of course snow that melts into water. Traditional hard surfaces like concrete or asphalt are impervious – water can’t go through them, so it runs off, often into storm drains or pooling in low spots. This can contribute to issues like erosion, overwhelmed storm sewers, or icy patches where water sits and freezes. With permeable pavers, we turn that around. Permeable paver systems are designed to let water infiltrate down into the ground through the joints (All About Concrete Pavers – This Old House). How? The pavers themselves might be spaced slightly further apart, and instead of fine sand or polymeric in the joints, we use a clean gravel or special joint material that allows water to pass. Underneath, the base is layered with different sizes of stone that act as a retention basin, temporarily holding water and letting it slowly seep into the soil.
The result: When it rains on a permeable paver driveway or patio, the water disappears between the pavers and is naturally filtered by the ground, rather than sheeting off to the street. This is great for a few reasons:
- Reduces runoff: Less water overwhelming storm drains means lower risk of local flooding during heavy rains. If you live in an area that sometimes gets backed up storm sewers, or you have a low spot in your yard that floods, permeable pavers can help alleviate those issues by handling water on-site.
- Prevents puddles and icing: Your patio won’t have standing puddles after a storm, and in winter there’s less surface water to freeze into ice. This goes back to safety – a dry surface is a safe surface.
- Eco-friendly filtration: As the water goes through the layers under permeable pavers, it’s filtered naturally, which can trap pollutants like oils or heavy metals before they reach groundwater or waterways. By the time the water percolates down, it’s cleaner. You’re basically mimicking the way natural ground absorbs rain, even though you have a hard surface there.
- Suitable for local regulations: Some areas have stormwater management rules or encourage permeable surfaces to reduce strain on infrastructure. In certain parts of New York, using permeable pavers might even earn you credits or incentives, especially if you’re replacing a larger driveway or adding a lot of paving. It’s worth noting if any such programs exist in Onondaga or Oswego County; I stay up-to-date on this to advise clients. Even if not, it’s a proactive way to adhere to good environmental practice.
Besides permeable pavers, another eco-friendly aspect of concrete pavers is that they often use concrete made from local materials, and sometimes even include recycled content (like recycled aggregates). The fact that pavers can last for decades means you’re not needing to replace and throw out materials frequently – that longevity is environmentally friendly in itself (less waste over time). And if a paver area ever does need to be taken out, the pavers can be reused or recycled (crushed for aggregate). Compare that to ripping up asphalt – which often just goes to a landfill or has to be reheated (which uses a lot of energy).
There are also paver products marketed as “green” solutions – for example, some lighter-colored pavers can mitigate urban heat island effect by reflecting more light (though in a residential yard that’s a minor point). There are even vegetated pavers (with holes for grass to grow) which are used for overflow parking areas or low-traffic areas to maintain a green look; these can be a creative solution if you want a lawn-like appearance that can also handle occasional car weight without becoming muddy.
A practical scenario: If your home in Fulton has a driveway that goes downhill and you’re constantly seeing water gush toward your garage during storms, a permeable paver driveway could significantly reduce that water flow by absorbing a lot of it. Or, if you live near Oneida Lake or a creek where you’re conscious of runoff, installing a permeable patio shows you care about the local waterways – you’re preventing dirty runoff from heading straight into the lake. I’ve had environmentally minded clients near Skaneateles Lake opt for permeable pavers to protect the purity of the lake water by handling their stormwater on-site.
Maintenance of permeable pavers is a bit different (you occasionally need to vacuum out sediment from joints to keep them infiltrating well), but it’s not difficult and we can guide you on that. The good news is, modern permeable pavers look just as attractive as regular ones – you wouldn’t even notice a difference at first glance. They interlock nicely and come in various styles too.
In short, if you want to combine home improvement with environmental stewardship, concrete pavers give you that opportunity. They address drainage concerns effectively – an important factor in our often soggy Central NY climate – and contribute to a more sustainable property. I’m proud when a client chooses a permeable paver project because it’s a win-win: you get a beautiful patio or driveway and you’re doing something beneficial for your community’s ecosystem. At Ground Force, we’re experienced in designing and installing these systems, so we’d be thrilled to help you go green (or rather, go permeable!) with your outdoor upgrade.
Why Professional Installation is a Must (The Downside of DIY)
Alright, so by now you’re probably sold on the idea that concrete pavers are fantastic. You might even be eyeing that side yard of yours thinking, “I could put a nice little patio there.” The next question is: Should you do it yourself or hire a professional? As a proud DIY-er for many home projects, I’ll be the first to applaud folks who like to get their hands dirty. However, when it comes to installing premium concrete pavers – especially for something you want to last and add value to your home – I strongly believe professional installation is a must. Let me put it this way: I’ve gotten more than a few calls to “fix” DIY paver projects gone wrong, and those conversations usually start with, “I wish I had called you before I started.”
In this section, I’ll go over the downsides of DIY paver installation and why trusting pros like my team at Ground Force Property Services is worth it. We’ll talk about the hidden costs of DIY mistakes, the absolute importance of a proper foundation and drainage, common issues like paver shifting or sinking if things aren’t done just right, and the sheer time and labor involved. It’s not about discouraging your can-do spirit – it’s about making sure your investment in pavers truly pays off in the long run.
Hidden Costs of DIY Mistakes
DIY might seem like a great way to save money on a project. At first glance, you figure, “I’ll just buy the pavers and materials, watch a few YouTube videos, spend a couple of weekends, and boom – new patio for cheap!” I appreciate that line of thinking. But often, the reality is quite different. There are a lot of hidden costs to DIY, especially when mistakes happen (and they do happen). Some of these costs are measured in dollars, others in headaches and time. Let’s unpack a few:
- Buying or Renting Tools and Equipment: Professional paver installers come equipped with tools of the trade – plate compactors, masonry saws, levels, transit lasers for grading, etc. If you DIY, you might need to rent equipment like a compactor or a stone saw. Those rental costs add up, especially if your weekend project drags into multiple weekends (cue the additional daily rental fees). And if you’re not familiar with using them, there’s a learning curve. One DIY-er I knew rented a compactor and ended up compacting the pavers too much after laying, which caused some to crack – an expensive mistake. Also, small tools and materials like stakes, mallets, tampers, knee pads, even the cost of delivering tons of gravel and sand to your house – these often get overlooked in the budget. Professionals typically include all that in their price, so you get one transparent cost.
- Material Calculation Errors: Figuring out how much gravel, sand, and paver area you need is something we pros do routinely, but as a DIY first-timer, it’s easy to miscalculate. Order too much and you’ve wasted money; order too little and you’re stuck mid-project having to get more (sometimes the new batch of pavers might be a slightly different color if it’s not from the same lot – I’ve seen that happen!). I once consulted for a homeowner in Marcellus, NY who DIY-ed a patio and ran out of base gravel. By the time he got the second load, some of the first layer had saturated with rain and he ended up with uneven compaction. He eventually had to re-order even more to correct it. So a job that needed 5 yards of gravel turned into 8 yards purchased due to trial and error. Cha-ching – more costs.
- Mistakes and Redoing Work: If a professional crew makes a mistake (rare, but say something settles weird), they’ll typically fix it as part of their service/warranty. If you make a mistake, you have to spend more to correct it. For example, a common DIY mistake is not excavating deep enough or not compacting the base enough. Everything may look fine for a few months, then next spring you notice dips or wobbly pavers. To fix that properly, you’d have to pull up the pavers, dig out more base, add material, compact, and relay them. That’s basically doing the job twice – double the labor and possibly more materials. I’ve met DIY folks who gave up at that point and called us to re-do it properly, essentially paying for a professional install on top of what they already spent themselves. Ouch.
- Buying the Wrong Materials: Not all pavers and sands are created equal. If you’re not familiar, you might buy a subpar product because it was on sale, or use cheap sand that doesn’t lock pavers in place. A hidden cost here is that you might end up with a patio that deteriorates faster (so you saved $200 on materials but lost years of life on the project). Pros use premium materials we trust. Also, sometimes DIYers don’t realize they need things like edge restraints (plastic or aluminum edging that holds the pavers from spreading) – skip that, and your pavers might start spreading at the edges, ruining the pattern and causing a trip hazard. Then you’re at the store buying edge restraints and trying to retrofit them – more cost, more hassle.
- Injury or Damage Costs: I don’t want to scare you, but the reality is moving several tons of stone, sand, and pavers is hard physical work. Back strains, smashed fingers, foot injuries from dropping a paver – I’ve seen them all. If you or a helper get hurt, that’s a personal cost (and possibly medical bills) that’s often overlooked. Professional installers are trained in safety, have crew to share the load, and are insured. We also know how to handle materials to avoid damage – for instance, it’s easy to scratch a paver’s surface if you don’t handle it right, or to scuff up the facade of your house when wheelbarrowing loads of gravel by it. A ding on your siding or a broken sprinkler line because you didn’t know it was there can add to your project costs unexpectedly.
- Time is Money: Maybe not a direct expense, but your time has value. If a project drags on, you might be sacrificing weekends that could be spent enjoying the summer with family or friends. I’ve had clients tell me, “I started this DIY project and 3 months later, we still don’t have a usable patio for that July 4th party… I regret not calling you from the start.” There’s an emotional cost to a half-finished or poorly finished project – frustration, disappointment, even maybe some household friction if the spouse is unhappy the yard’s a mess for months. A professional crew can typically knock out a project in days that might take a DIYer weeks or months. That means less time living in a construction zone and more time enjoying the finished product.
In essence, while DIY seems cheaper on paper, the potential hidden costs (from extra materials, tool rentals, mistakes, lower longevity, to personal costs) can quickly make it more expensive than hiring a pro. And remember, when you hire a professional like Ground Force, you’re not just paying for labor – you’re paying for expertise, efficiency, and peace of mind that it’s done right the first time. We’ve fine-tuned our process to avoid costly errors and waste, and we often get contractor pricing on materials which can offset some labor costs. Plus, our work comes with warranties, so you won’t be reaching into your own pocket if something settles or goes wrong later – we’ve got you covered.
I say, let DIY be great for painting a room or building a simple garden bed, but for something as impactful (and complex) as a paver installation, consider the full picture. Sometimes the “cheapest” way ends up being the most expensive way when all is said and done. Save yourself the potential pitfalls – your wallet (and perhaps your back) will thank you!
Importance of Proper Foundation and Drainage
If there’s one thing I want every homeowner to understand about paver installations (or any hardscape), it’s this: everything rests on the foundation. You could buy the fanciest, most expensive pavers in the world, but if they’re not sitting on a properly built base, you’re going to have problems sooner or later. In our line of work, we have a saying: “Your pavers are only as good as what’s under them.” This is why professional installation is so critical – getting the foundation and drainage right is a science and an art, and it’s where DIYers often slip up. Let’s break down why the base and drainage are so important.
Excavation to the Right Depth: A common underestimation in DIY projects is how deep you need to excavate before laying a paver patio or driveway. It’s not just about removing a couple of inches of grass and tossing pavers on top. Typically, for our Central NY climate, we excavate several inches down – enough to accommodate a thick layer of compacted gravel base, plus bedding sand, plus the paver height, so that the finished surface is at the desired level. For a patio or walk, that might mean digging out 6-8 inches; for a driveway, 10-12 inches or more. This is because the base does the heavy lifting of distributing weight and absorbing ground movement. I’ve seen DIY patios where only 2-3 inches of sand were used under the pavers laid right on un-compacted soil – they looked great for a month, and then they started to settle unevenly and develop low spots once the weight of use hit them. A properly dug and filled base is key to longevity (All About Concrete Pavers – This Old House).
Quality Base Material: We always use crushed stone/gravel (like crusher run) for the base, not round pebbles or just sand. Crushed stone compacts into a sturdy, interlocked layer. You’d be surprised how many DIY instructions get this wrong or oversimplify it. The type of gravel, the moisture content when compacting, the layer thickness – these factors matter. We often lay the base in multiple layers (2-4 inches at a time), compacting each layer fully with a vibratory plate compactor. This step-by-step compaction yields a rock-solid foundation. If you dump 8 inches of gravel and try to compact all at once, the top might compact but the bottom may still be loose – that can lead to future sinking. A pro knows the right technique.
Leveling and Slope: Proper base prep also involves grading the surface for drainage. You usually want a slight slope (around 1/4 inch drop per foot) away from your house or any structures, so water runs off the surface to a desired area (like a yard or drainage zone). We use laser levels or string lines to get that slope just right across the whole patio or driveway. A DIYer might end up with an almost flat surface (leading to water pooling) or an uneven slope that causes water to go toward the house (a big no-no, can lead to basement leaks). I remember a case in North Syracuse where a homeowner installed a paver area himself and later realized every time it rained, water flowed into his garage. We had to lift a lot of it and regrade – which is tedious once pavers are already in. Professionals plan the drainage angle from the start, preventing those issues.
Edge Containment: Part of a sound foundation is containing it properly. We install edge restraints around the perimeter of a paver project (except where edges are retained by solid structures). These edges are then usually staked into the ground. Without a good edge, the pavers at the border can creep outwards over time, which then lets the sand under pavers slowly migrate and the base to loosen. It’s like the frame of a puzzle keeping all pieces tight. Missing edges won’t cause immediate failure, but over a year or two, you’ll see the telltale signs of pavers spreading and gaps forming along the outside. Pros won’t forget edge restraints; a DIYer might not even know they need them until it’s too late.
Drainage Solutions: Sometimes, beyond just sloping, we integrate drainage solutions like a French drain or a catch basin if an area has a lot of water. For example, in a particularly low backyard in Oswego County, we installed a patio and underneath ran a drain tile to channel water away that would otherwise sit under the patio. Knowing when to add extra drainage, or using permeable base vs. dense base, etc., comes from experience. If your yard has clay soil (common around here), it might hold water like a bowl; we adapt our base in such cases (maybe a thicker gravel layer or a drainage pipe at the edge). These nuances ensure that water doesn’t weaken your paver project over time.
The Frost Line: Upstate New York’s ground freezes deep in winter. If water is trapped in your paver base and freezes, it can heave (expand) and then when it thaws, the base may settle unevenly. A pro installer mitigates this by using that proper crushed stone base (which has voids for water to drain through) and by making sure there’s no pockets of organic soil or clay clumps that hold water. Essentially, we create a base that can handle freeze-thaw by being both solid yet allowing moisture to move. We might also incorporate geotextile fabric beneath the base to keep soil and gravel separate (so the soil doesn’t mush up into your base over time, which would weaken it).
Professional Insight: Let me share a quick story. We did a driveway in Baldwinsville where the homeowner was curious and watched our every move (which I welcome – I love explaining what we do). After seeing the extensive digging, layering of base, careful leveling, and multiple rounds of compaction, he said, “Wow, I had no idea so much work went in before even one paver was laid.” Exactly! For a week-long project, often 2-3 days is just base prep. But that’s what ensures the next 20+ years that driveway will remain level and strong. The homeowner admitted that had he tried DIY, he probably would have skimped on all that not realizing its importance.
At Ground Force, we actually enjoy the technical side of building a bulletproof foundation – it’s where our veteran attention-to-detail really kicks in. We know that an extra hour spent perfecting the base layer could save the homeowner from a headache 5 years down the road. It’s truly the difference between a professional job and a makeshift job.
So, the importance of proper foundation and drainage in paver projects cannot be overstated. It’s not the glamorous part of creating a new patio, but it’s absolutely the most crucial. When you hire pros, you’re paying for that know-how and labor that ensures your patio or walkway isn’t going to sink, shift, or become a water hazard. If you DIY without deep knowledge, you risk undermining the whole investment. Think of it like building a house – you wouldn’t erect the walls on a poorly poured foundation; same logic applies to pavers on the ground. We’ll make sure your pavers are sitting pretty on a foundation that’s solid as a rock (literally!).
Issues with Paver Shifting, Sinking, or Cracking if Not Installed Correctly
I often tell my crew that our goal in installing pavers is to make it look like they’ve been there forever and will stay that way. When you walk on a professionally installed paver surface, it should feel as solid as concrete. You shouldn’t notice any wobble, any tilt, any unevenness – just a smooth, stable surface. Achieving that requires everything we discussed about proper foundation, plus correct installation techniques. When those aren’t followed (as is often the case with inexperienced installations), you can end up with pavers that shift, sink, or crack. Let’s talk about why these issues happen and how pros prevent them.
Shifting Pavers (Lateral Movement): This is when pavers start moving apart or slipping out of alignment. One major cause is lack of proper edge restraints (as I mentioned earlier). Without those, the outside pavers gradually push out, especially under the weight of cars or just repeated foot traffic and freeze-thaw expansion. Once the outside moves, the pattern can loosen and more internal pavers can shift out of place. It’s like a domino effect. Another cause of shifting is not having tight joints or using the wrong joint sand. After laying pavers, we add sand (often polymeric sand that hardens slightly) and then vibrate the pavers to ensure that sand gets in all the cracks and locks them together. If someone skips that or doesn’t fully sand the joints, the pavers can rub and move. Professional installation ensures tight locking of pavers, virtually eliminating lateral shifts. We also often lay pavers with a slight gap (the built-in spacers take care of this) and then fill that gap precisely – it’s a balancing act of not too tight (to allow a bit of give for expansion) and not too loose.
Sinking or Settling: This is probably the most common issue I see with poorly installed pavers. You might get a beautiful DIY patio that looks great through its first summer, but by the next spring, you notice a low spot where puddles form, or one corner of a paver has sunk below its neighbors. This is almost always due to insufficient compaction or base prep. Either the soil wasn’t compacted before laying base, or the base itself wasn’t compacted in layers, or not enough base material was used for the soil conditions. Sometimes it’s localized – for example, if someone buried a tree stump under where the patio went (or some organic material) and it later decomposed, leaving a void that the pavers sink into. A professional will dig out any questionable material and replace it with sturdy fill. We also consider loading: under heavy objects like a hot tub or a fire pit feature, we might beef up the base or use a concrete pad under the pavers because we know point loads can cause settling if not accounted for. Improper drainage can cause settling too – if water washes away the sand under pavers or erodes the base, you get voids. That’s why we pay attention to drainage and sometimes use fabrics to keep things in place. When we install, we compact the base, we compact the sand bed, and we even compact the pavers after laying (with a protective mat) to ensure they all “set” in nicely. This three-tier compaction ensures your patio stays level (All About Concrete Pavers – This Old House).
In short, with professional installation, sinking is unlikely; with DIY or cheap install, it’s almost a matter of when, not if.
Cracking Pavers: One of the selling points of pavers is that the pavement doesn’t crack, the individual units take the pressure. However, if not installed right, you can still see cracked pavers on occasion. Here’s how that can happen:
- Using the wrong paver for the job: There are thicker pavers for driveways (usually 8cm thick) and standard ones for patios (6cm thick typically). If someone uses thin pavers where a car drives, they might crack under the weight. We always choose the correct product for the application.
- Inadequate base leading to flex: If a paver is bridging a little dip in the base that wasn’t filled, when weight comes on it, it might crack since there’s a void beneath supporting it unevenly. This again goes to meticulous base leveling – each paver should have full support underneath.
- Improper compaction causing tipping: If one paver sits a bit cockeyed because the sand wasn’t screeded flat, and then you compact, you could stress an edge. Usually quality pavers are strong (8000+ PSI compressive strength), so they don’t crack easily. I’ve seen more cracked pavers from things like hitting them wrong when cutting or dropping them, than from being in service. But if you see cracking in a laid paver, it’s a red flag that something is off in the install.
Uneven Surfaces (Lippage): Not exactly shifting or sinking, but a related issue is when pavers aren’t level with each other, creating lips or tripping points. This comes from poor screeding of the bedding layer or not checking each paver’s level relative to its neighbors as you lay them. Pros have rubber mallets and levels on hand, constantly tapping down high corners or shimming up low ones with a touch more sand if needed, so the final surface is flat. DIYers might just lay all pavers and assume the sand will make it all even, but then you walk on it and feel the unevenness. It’s easier to do it right the first time than to try to fix after the fact.
When pavers shift or sink, not only is it an eyesore and trip hazard, it can defeat the purpose of your investment. You paid for a nice patio; you don’t want a miniature skate park with ups and downs! Plus, if it gets bad, you might have to pay to redo it, basically doubling the cost.
Professional installers like us pride ourselves on installations that stay put. We often offer a warranty on our workmanship (for example, a year or two guarantee that if any settling occurs, we’ll come fix it free of charge). I can count on one hand the number of times we’ve had to go back and adjust a settled paver, and in each case it was a spot over an old tree root or unexpected issue. We handle those gladly, and it’s rare. But that peace of mind for you is huge – knowing that if something goes wonky, you’re covered.
Contrast that with DIY or hiring an unqualified handyman – if the patio sinks, you’re either living with it or shelling out more money to repair it. And sometimes a patch repair is just that, a patch – it might not fully correct the underlying flaw, and you get a less-than-perfect surface afterward.
In conclusion on this point, shifting, sinking, and cracking are symptoms of poor installation that you simply shouldn’t have to deal with. With professional installation, the risk of these problems is dramatically reduced, and if they do occur, you have a resource to set it right. My aim with Ground Force is that a year after installation, the only thing you notice about your pavers is how much you love using your new outdoor space – not a single worry about the integrity of the work.
The Time and Labor Involved: DIY vs. Hiring a Pro
Time to get real about the work. Installing concrete pavers is labor-intensive. There’s no sugar-coating that. It’s rewarding work (I still jump in with my crew on projects because I enjoy the process), but it will break a serious sweat. If you’re considering DIY, you have to weigh the time and physical effort you’ll invest against the convenience and expertise you get by hiring pros.
Let’s walk through a typical project timeline to illustrate the difference:
DIY Timeline Example: Imagine you want to build a 12’ x 20’ (240 sq ft) patio in your backyard in Camillus.
- Planning & Learning: As a DIYer, first you’ll spend time researching – watching tutorials, reading how-to guides, maybe asking questions at the home center. This could be hours or days of prep to feel confident. (Time = maybe 10-20 hours of planning.)
- Gathering Materials: You’ll need to order pavers, have them delivered (or pick them up if you have a truck and make multiple trips). Same for gravel, sand, edging, etc. Coordinating this and physically moving materials into your backyard is a significant chunk. (Time = perhaps one full weekend just to get everything staged, plus any delivery fees or favors from friends with trucks.)
- Excavation: Removing sod and digging 8” down for 240 sqft means moving about 5-6 cubic yards of soil. That’s roughly 100-150 wheelbarrow loads. If it’s just you (and maybe a buddy for a day), expect a long, grueling weekend of digging. Professionals might use a skid-steer loader to do this in a couple of hours; by hand it could be 2-3 days of hard labor depending on soil and your stamina. (Time = 2-3 days DIY, plus then you have a giant pile of dirt to dispose of or spread somewhere.)
- Base and Sand Prep: You need to haul in the gravel (likely ~4-5 cubic yards) and sand (~1 cubic yard). That’s again dozens of wheelbarrow trips from your driveway to the patio area. Then you have to spread and compact in layers. If you rented a plate compactor, you’re wrestling a heavy machine around repeatedly. Screeding the sand flat takes patience and precision (often having to set pipes or guides to drag a board across). This step for a DIYer might be another couple of days to do right, maybe longer if weather interrupts. (Time = 1-2 days placing base, 1 day screeding sand.)
- Laying Pavers: Now the “fun” part – but it’s not a walk in the park either. Each paver (depending on size) could weigh 20-30+ lbs. For 240 sqft, you might have 600+ pavers to lay one by one, on your hands and knees. That’s repetitive and tiring. You’ll need knee pads, and you’ll be getting up and down a lot to cut pavers for edges or fetch more from the pile. If you’re particular, you might relay some sections to get the pattern right. Let’s say you manage ~50 sqft an hour (which is optimistic for a newbie), that’s at least 5 hours of just placing, probably more like 8-10 hours with breaks and adjustments – maybe spread over two days to be safe. (Time = 1-2 days.)
- Edging and Sanding: After laying, you install edge restraints around (more kneeling and hammering in stakes). Then spread sand or polymeric sand on top and sweep into joints, then compact and refill joints until full. Then possibly wet the polymeric sand. This could be a half day’s work for a DIYer meticulously making sure all joints are filled. (Time = 0.5-1 day.)
- Clean Up and Finishing: You’re likely looking at your new patio, a pile of excess materials, extra sand here and there, and the surrounding lawn that might be a bit torn up. Clean-up of leftover materials, return rented tools, and touch up the landscape edges might take another day.
Add all that up: A motivated, skilled DIYer working mostly alone might take 2 full weekends and several evenings (let’s call it maybe 5-6+ total working days) to finish a 240 sqft patio. If unforeseen issues pop up (rain delay, need more material, error in slope that requires redoing), it could stretch to 3-4 weekends. During this time, your yard is a construction zone, and you’re likely exhausted by sundown each day.
Professional Timeline: Now, let’s see how Ground Force Property Services (or any efficient crew) would handle the same project.
- Day 1: Crew of 3-4 arrives. We have machinery to quickly excavate the area and haul out soil (a few hours). By midday, start bringing in base gravel with wheelbarrows or machine, compact in layers. By end of Day 1, excavation is done and the gravel base is likely compacted and in place, graded to rough slope.
- Day 2: Morning, finish any base grading, lay bedding sand and screed it perfectly. Late morning onward, start laying pavers. With a team, one person cuts, two lay, one brings pavers – production goes quickly. By late afternoon, most if not all pavers are laid in pattern.
- Day 3: Finish laying any remaining pavers/cuts. Install edge restraints. Sweep sand into joints, compact, refill joints. Clean up site, polish off details. By afternoon, project is complete and crew packs up.
Total professional time: ~3 days (sometimes 2 long days, sometimes 4 if something custom or weather issue, but generally very fast relative to DIY). And you, the homeowner, didn’t lift a finger except maybe to bring out lemonade 😉.
Now, let’s talk about labor intensity. If you hire pros:
- You save your back and knees. Honestly, paver installation is back-breaking work. Pros are used to it, have techniques to avoid injury (and still we feel it after a long week!). As a homeowner, you might not be accustomed to hefting stones and pounding a compactor all day.
- You avoid the stress. There’s mental labor too in a project: worrying “Am I doing this right? Oh no, it rained, did it ruin my base? Did I compact enough? This cut isn’t fitting right, what do I do?” When you have us do it, you can literally sit back and watch it unfold without that stress. Or better yet, go to work or do something else and come home to see progress done for you.
- Expert problem-solving on the fly: We sometimes hit snags – maybe an unexpected tree root, or the ground is softer on one end requiring extra base – but we handle it swiftly. If you hit the same as DIY, it might stall you for days as you figure out a solution.
Time is money, but time is also quality of life. If you spend your entire summer on a DIY patio, you lose precious time you could spend enjoying the short but sweet Central NY summer doing actual fun things (like barbecuing on that patio). Hiring a pro compresses the timeline drastically, meaning less disruption to your life and faster gratification.
There’s also the guarantee of a job well done. Instead of laboring and hoping it comes out okay, you invest in professionals and expect a great result (and if anything isn’t right, it’s on us to fix it). For many homeowners I talk to, that peace of mind is worth it. One client in East Syracuse told me, “I thought about DIY to save some money, but seeing how efficiently your crew did this in 3 days, I have no regrets. I would have been battling this for a month and still not get it this perfect.”
I’ll add: if you truly love DIY and have the physical capability, start with a small project – maybe a little garden path – to test the waters. But for a significant installation that you want to last and add value to your home, the time and labor saved by hiring pros is substantial. As a veteran, I appreciate hard work, but I also know the value of a well-trained team accomplishing a mission efficiently. That’s what we bring to the table (or patio, in this case).
In short, consider what your own time is worth and how quickly you want results. If spending multiple weekends doing manual labor isn’t your idea of fun, leave the heavy lifting to us. We’ll get it done with a smile (and probably save you a chiropractic visit).
Concrete Pavers vs. Other Materials
By now, you might be wondering how concrete pavers stack up against other common paving materials. It’s a great question because as a homeowner, you have several options for surfaces: you could pour a concrete slab (maybe even stamp it for pattern), you could lay down asphalt in some cases (mostly for driveways), or you could use natural stone like flagstone or fieldstone. Each material has its own pros and cons, but I’m going to explain why, in many scenarios, concrete pavers come out on top – especially for our climate and for homeowners who value long-term performance and beauty.
We’ll compare Concrete Pavers vs. Stamped Concrete, Concrete Pavers vs. Asphalt, and Concrete Pavers vs. Natural Stone. I’ve worked with all of these materials in one form or another, so I’ll give you a frank rundown from my professional (and somewhat biased, I admit – I love pavers!) perspective.
Concrete Pavers vs. Stamped Concrete
If you want a decorative patio or driveway, the two options often at the top of the list are pavers or stamped concrete. Stamped concrete is regular concrete that’s poured in place and then embossed with patterns and colored to look like stone, brick, etc. It can look pretty good when first done, and I understand why some homeowners consider it – it’s a single poured surface (no individual units), which some think might be simpler. However, there are several reasons I (and many others) favor pavers over stamped concrete:
1. Cracking and Durability: We touched on this earlier, but it’s worth repeating: concrete cracks. It’s not a matter of if, but when. Stamped concrete, being a concrete slab, is subject to cracking due to ground movement, shrinkage, or freeze-thaw. Installers do cut control joints (lines) to encourage cracks to happen in neat lines, but those joints themselves break the pattern’s look, and cracks can still occur unpredictably. When stamped concrete cracks, it’s not easy to fix – you either live with the ugly crack (which disrupts that beautiful pattern you paid for), or you have to patch or re-pour, which seldom matches perfectly. In contrast, *pavers won’t crack in the same way (All About Concrete Pavers – This Old House)】. The small joints between them handle the movement. In 10 years, your pavers will likely be intact and level, whereas a stamped slab may have multiple cracks and possibly sections that have shifted or settled.
2. Repairability: Related to cracking – with pavers, if you need to fix something (say, a tree root causes a bump, or you want to run a new gas line to your grill), you can lift pavers, do the work, and put them back without any evidence of disturbance. Try that with stamped concrete! You’d have to saw cut a section out, jackhammer it, then re-pour, and it will be nearly impossible to match the color and stamp pattern exactly (the old vs new concrete will always show). Pavers are modular and replaceable pieces – a huge advantage for any future needs or unforeseen repair (All About Concrete Pavers – This Old House)】.
3. Maintenance: Stamped concrete usually needs to be sealed to protect its color and surface. Many stamped concrete installers will seal it right after curing, giving it a glossy look. That sealer wears off and you need to reapply every couple of years to keep it looking good and prevent stains or color fade. If you don’t, the color can wear down and the concrete can get chalky or stained. Pavers, as discussed, typically do not require sealing (only optional) and their color is throughout, not just a surface layer. Also, stamped concrete can get slick when sealed or even when just wet, since it’s essentially a painted/colored concrete surface. Pavers with their textured surfaces maintain better grip.
4. Aesthetics and Variety: Stamped concrete has come a long way, and some jobs do look nice – but many people can still tell it’s faux. The patterns often repeat and the “grout” lines in stamps are just colored indentations, which can look artificial up close. Pavers, being real units, have genuine joints and shadows that make them look more natural. Also, if part of a stamped concrete pattern is a different color (like “grout” lines or multi-color effects), those are surface-applied colors that can wear or flake. Pavers’ colors are integral to each block. Plus, the range of patterns and colors in pavers is enormous, whereas stamped concrete is limited by the stamp mats the contractor has and the skill of their coloring technique. If you want a very specific look, chances are there’s a paver for it. If you want stamped concrete, you might hear “we have these 5 stamp patterns and 8 colors to choose from.”
One thing stamped concrete proponents might say is that stamped can be cheaper than pavers for large areas, because pavers are hand-laid piece by piece, whereas concrete is poured en masse. This can be true initially – stamped might be a bit less in upfront cost than premium pavers (though high-end stamped can cost as much as pavers, especially if using multiple colors or complex patterns). However, consider cost over time. If that slab cracks or fades and you need to rehab it or replace it in 10-15 years, that’s a big cost. Pavers might cost a bit more upfront but last much longer and avoid repair/replacement costs, making them more cost-effective in the long ru (All About Concrete Pavers – This Old House)】.
I recall a customer in Cicero, NY who was torn between stamped concrete and pavers for a large patio. I gave him some addresses of each type to look at in person. He noticed the stamped ones had visible cracks or looked a bit worn, whereas the paver ones, even older installs, still looked sharp. He opted for pavers and later told me he was so glad he did, especially after a neighbor’s stamped patio chipped and spalled in a few places after a couple winters (likely from salt use and freeze-thaw).
5. Climate Compatibility: Our freeze-thaw climate is just not kind to concrete. Stamped concrete in Florida? Sure, go for it – it might stay pristine for a long time with no freezing. In Central NY, each winter puts stress on that slab. Pavers are designed for freeze-thaw; the small movements prevent damage. Additionally, if de-icing salts are used, they often spall the surface of regular concrete (even if stamped and sealed, over time salt can eat away or dull the sealer and then the surface). Many concrete pavers are manufactured to be salt-resistant and tested for cold climates. It’s one reason why you see city sidewalks and streets in snowy cities often using pavers now – they hold up.
To sum up, concrete pavers vs. stamped concrete often comes down to flexibility vs. rigidity. Pavers flex (and thus don’t crack), are easy to fix, and come in many looks. Stamped concrete is one big piece – it might look nice at first, but it’s one-and-done, and if something goes wrong, you’re stuck. In my professional opinion, pavers provide a more durable and maintainable beauty, which is why we specialize in them. Some homeowners do choose stamped for various reasons, and we respect that, but we’ve positioned Ground Force as a paver specialist because we truly believe it’s the superior choice for most driveways, walkways, and patios in this area.
Concrete Pavers vs. Asphalt
When it comes to driveways (and occasionally large patios or sport courts), asphalt is another material people consider. Asphalt driveways are pretty common in our region because historically they’ve been a cheaper option for long driveways or large areas. So you might wonder, why not just use asphalt for, say, your driveway or a backyard basketball area, instead of pavers? Let’s break it down.
1. Aesthetics and Curb Appeal: Asphalt is essentially blacktop – a mix of tar/bitumen and stone aggregate that’s spread and rolled hot. It gives you a flat, black surface. While it can look neat and clean when new, it’s not exactly pretty or customizable. Every asphalt driveway looks about the same (black, maybe grayish as it ages). It certainly doesn’t add the kind of upscale curb appeal that pavers do. Concrete pavers, by contrast, can be chosen to complement your home’s color and style. A paver driveway can be a statement piece – think of a beautiful driveway in Fayetteville with a border, or an inviting walkway in Syracuse with rich tones. Asphalt just can’t deliver that wow factor. If you have a nice home and landscaping, a plain black driveway might actually detract from the overall look, whereas a paver driveway or walkway enhances it.
2. Longevity and Durability: Asphalt’s lifespan is relatively shorter. In our climate, a well-installed asphalt driveway might last 15-20 years if maintained, maybe a bit more in ideal cases. But it will degrade: cracks, potholes, and crumbling edges are common as it ages. Those big cracks can let water in, which in winter freeze and make them worse. You’ve likely seen old asphalt driveways that look like an alligator’s back (lots of cracks) – that happens typically in 10+ years or sooner if the base wasn’t great. Pavers, on the other hand, can last 30, 40, 50+ years. The pavers themselves won’t “wear out” like asphalt does from UV and oxidation. And as we covered, if base was done right, they won’t crack apart. So in terms of durability, pavers have the edge. There are actually paver roads in Europe and even parts of the US that have been in service for decades – they just require occasional maintenance of joints.
3. Maintenance: Asphalt needs regular maintenance. Ideally, you should sealcoat an asphalt driveway every 2-3 years to replenish the tar binder that UV breaks down. That’s an extra cost and hassle (either DIY buckets of sealer or hiring a sealcoat company). If you don’t do it, the driveway dries out, lightens in color, and cracks easier. You may also need to fill cracks periodically. Snow removal on asphalt is straightforward, but if you accidentally gouge it with a plow it can leave a mark or scrape off the top. With pavers, there’s no sealing needed, and as long as the pavers are quality, plowing or shoveling won’t hurt them (just avoid metal shovels without a plastic edge to not scratch if you have textured ones). If a paver cracks (rarely), swap it; if asphalt cracks, you fill it with tar goop which is ugly, or eventually repave.
4. Seasonal & Temperature Considerations: Asphalt can get very hot in summer sun because it’s black and absorbs heat. I’ve seen situations where kids can’t play on the driveway barefoot, or the homeowner doesn’t want to park a car after driving long because the hot tires might leave indentations in really hot weather (this can happen if the asphalt is new or if it’s a super hot day on a black surface). Pavers, especially lighter color ones, stay cooler. Even darker pavers don’t typically get as soft or scorching as asphalt. In winter, asphalt can get brittle in extreme cold, whereas pavers remain solid. Also, have you noticed how an asphalt driveway edges can crumble where it meets lawn? That’s partly because there’s no structural edge; pavers have edge restraints and are thick stone units, so edges stay crisp.
5. Cost Over Time: Upfront, asphalt is usually cheaper than a paver driveway. This is probably the only big advantage of asphalt: lower initial cost, especially for long driveways where using premium pavers might be quite an investment. If budget is tight and you need a new driveway, asphalt can be a reasonable short-term solution. But consider the long-term cost: sealing every few years, repairs, and eventual replacement in 15-20 years. With pavers, initial cost is higher, yes – maybe 1.5 to 2 times the cost of an asphalt driveway (depending on paver choice). But you likely won’t be shelling out for a new driveway for a very long time, if ever. And if you sell the home, a paver driveway can be a selling point that potentially increases the home’s value or curb appeal, whereas a slightly worn asphalt is just seen as a likely upcoming expense by buyers.
6. Environmental: Asphalt is impermeable and petroleum-based. Not that concrete production is eco-friendly (it has a carbon footprint too), but permeable pavers can help offset runoff issues – asphalt cannot. Water runs off asphalt into the street/sewer, possibly causing more stormwater issues. There are permeable asphalt mixes, but they are specialized and not common for residential use. Typically, if drainage is an issue, pavers can solve it better.
I’ll share an anecdote: A homeowner in Clay, NY had a long asphalt driveway that was deteriorating after ~18 years. They were torn between repaving with asphalt or upgrading to pavers. It was a big price difference, but they hated how the asphalt looked with their otherwise beautiful property. They opted to do a paver “apron” (just the area by the garage) and the front walk in pavers, and asphalt for the long stretch to save cost. Well, a couple winters later, the asphalt got a big frost crack and they ended up deciding to convert the rest to pavers too. Once they had a taste of the paver look and saw that the small area held up great with no cracks, they went all-in. That’s an option too – you can sometimes mix (like an asphalt drive with paver border or apron). We do that occasionally – it can spruce up asphalt and give some of the benefits of pavers where it matters (the apron takes a lot of turning car pressure, so pavers there won’t rut like asphalt might).
But ultimately, if the budget allows, a fully paver driveway is the premium choice. It’s the kind of thing that makes your home stand out – there’s a house in Manlius I drive by that has a gorgeous paver driveway with a circular design, and it always catches my eye. It elevates the whole property.
So, comparing concrete pavers to asphalt: pavers win on looks, longevity, and durability, while asphalt wins on initial cost and that’s about it (unless you love the color black!). Many of our clients choose pavers for walkways and patios regardless, but still do asphalt for the long driveway due to expense. That’s completely okay and we can work to blend them (like align the paver walkway nicely where it meets the driveway). But if you can swing it, pavers for the driveway will make you smile every time you come home. And as a vet who believes in doing it right the first time, I lean towards solutions that last – pavers have that lasting quality that asphalt just doesn’t match.
Concrete Pavers vs. Natural Stone
Natural stone – the phrase itself has a sort of romantic ring, doesn’t it? We think of flagstone patios, slate walkways, perhaps a cobblestone path from a storybook. As a hardscaping professional, I appreciate the beauty of natural stone. We’ve done plenty of projects using real stone, and they can be stunning. However, there are some practical considerations where concrete pavers often outperform natural stone, especially for everyday homeowners who want a combination of aesthetics, reliability, and value.
Let’s consider what “natural stone” encompasses: common choices around here might be bluestone or flagstone for patios/walkways, fieldstone or river rock for rustic looks, travertine or limestone for upscale pool decks, and of course old-school cobblestones or brick (brick is man-made clay, but often grouped with natural stone aesthetics). We’ll focus on flatwork like patios, walks, pool decks, because vertical stone (like a stone wall) is a different ballgame.
1. Cost: Natural stone can be quite expensive, both in material and in labor to install. For instance, a nice bluestone patio (those beautiful blue-gray slabs) might cost significantly more per square foot than a paver that mimics bluestone. The stones themselves are pricey, and because their thickness and size can vary, the labor to lay them is higher (each stone might need individual leveling, shimming, etc.). In contrast, concrete pavers are manufactured to be uniform, so installation is faster and more predictable. For homeowners on a budget, pavers give that high-end look of stone at a fraction of the pric (All About Concrete Pavers – This Old House)】. I’ve had clients initially say “I want a natural stone patio” but then balk at the price estimate; when I show them a concrete paver that looks very similar, they are relieved to see a much lower quote.
2. Consistency and Installation: Like I mentioned, natural stone pieces are not uniform unless they’re cut and processed (and if they are cut evenly like dimensional stone, they tend to be even more expensive). If you get a pallet of natural flagstone, each piece is a puzzle piece – different shapes, thicknesses, sometimes irregular surfaces. It takes a skilled mason to fit them together nicely (often with mortar or in a sand base, carefully leveling each). The end result is gorgeous if done right, but there’s a higher risk of lippage (uneven edges), and the labor is slow. Pavers, on the other hand, fit together perfectly by design, making a smooth surface. They’re also typically installed on a similar base (gravel and sand) without mortar, which many consider preferable for flexibility. If a stone is set in mortar and that mortar cracks (likely in freeze-thaw), it’s harder to fix. Pavers avoid that issue. As the This Old House guide notes, pavers are *more uniform in size and thickness, making installation easier (All About Concrete Pavers – This Old House)】.
3. Durability and Maintenance: This one can be a bit nuanced. Some natural stones are extremely durable (granite, for example). Others are more prone to weathering (sandstone can flake, limestone can wear). Natural stones often retain their appearance well over time (they might get a nice patina but not “ugly” usually). However, some can stain or grow algae in shady wet areas (just as pavers can, to be fair). One thing with natural stone is that if a piece cracks or breaks, finding a matching replacement could be hard if it’s a unique color/pattern stone. With pavers, you can keep a few extras from your install bundle for future repairs. Also, freeze-thaw can sometimes cause delamination in layered stones like some slates or flagstones; pavers are made to handle freeze-thaw robustly.
4. Slip and Comfort: Certain natural stones (like polished marble or even certain slates) can be slippery when wet, though typically we don’t use polished stone outdoors. Travertine (a natural limestone commonly used for high-end pool decks) has a great texture and stays cool, but it needs sealing periodically and can sometimes chip. Many concrete pavers are designed to emulate travertine or other stones, offering similar looks with a bit more slip resistance or easier maintenance (no sealing needed in many cases, whereas travertine often is sealed to prevent pool chemicals from staining it).
5. Aesthetic Options: Natural stone offers “unparalleled beauty and uniqueness (All About Concrete Pavers – This Old House)】, as one source put it – every piece is unique, which is lovely. If you want true one-of-a-kind character and have the budget, natural stone is awesome. However, modern pavers have gotten very good at mimicking stone randomness through mixed palettes and surface textures. You can get pavers that look strikingly like slate or flagstone, complete with variegated colors and textured faces. 95% of people might not even realize it’s not real stone until they stoop down and tap it. The advantage with pavers is you can get that look but also have the consistency in thickness for easier install. Natural stones shine in irregular, organic designs (like a winding flagstone path through a garden) where each stone is intentionally different. Pavers shine in more structured designs or when you want a clean finish (though you can still do curves and such with them by cutting).
6. Integration: If you have an older or historic home, sometimes natural stone might be more fitting to keep authenticity (for example, a 150-year-old home in Skaneateles might warrant real stone for a walkway for historical accuracy). But even then, there are pavers made to look antique. For most modern homes, pavers integrate beautifully and don’t look out of place.
Let me share a quick story: A client in Onondaga County wanted a patio that looked like the limestone patio at a winery they loved, which was done with irregular stone. We looked at actual limestone options, but ultimately chose a paver that had a random stone look (different shapes that interlock) with a tumbled finish. It achieved the rustic charm they were after, and we added a natural stone boulder here or there in the landscape for accents. They got the vibe they wanted, but we kept it within a reasonable budget and ensured easier installation. Another client had their heart set on a flagstone walk. We did do real flagstone, and it turned out great – but later she complained about weeds in the mortar joints and uneven settling of a couple stones. We came back and patched it, but it highlights that natural stone walks can have those maintenance quirks. If we’d done pavers, a quick polymeric sand brush-in would have stopped weeds, and settling likely wouldn’t have been an issue because of the uniform paver thickness and base.
7. Value: When it comes to adding value to your home, both pavers and natural stone are seen as upgrades. Natural stone might be perceived as more “luxury” to some buyers, but if it’s older and not maintained it could also be seen as a repair hassle. Pavers are viewed positively because people know they last and are relatively maintenance-free. I’d say use natural stone as an accent or for vertical elements (like a natural stone veneer on a seating wall with a paver patio floor) – that way you get the high-end touch of real stone without the entire project being at the mercy of the stone’s irregularities.
Conclusion: Concrete pavers vs. natural stone is a choice between the genuine article and a high-quality impersonator that has some practical benefits. Natural stone has undeniable beauty and a certain prestige, but it comes at a higher cost and sometimes a bit more maintenance or installation challeng (All About Concrete Pavers – This Old House)】. Concrete pavers offer most of the beauty, often more uniformity and ease, and usually at a lower cost. For many Central NY homeowners, especially given our climate and value-conscious mindset, pavers strike the perfect balance. But as always, I listen to what you want – if you have your heart set on that real stone path, we can talk it through. Just know that in the background, pavers are giving a friendly wave like, “Hey, I can do that too, and maybe for less!”
Now that we’ve compared materials, you can see why I’m such a fan of pavers. They consistently prove to be a top contender across durability, maintenance, aesthetics, and value. Next, let’s shift from materials to experiences – I’d love to share some success stories from homeowners like you who made the leap and invested in pavers, and how it turned out for them.
Customer Success Stories & Positive Reviews
One of the most satisfying parts of my job is seeing the smile on a homeowner’s face when a project is finished – and then hearing how it continues to bring them joy season after season.
In this section, I want to share a few customer success stories and positive reviews from folks right here in Onondaga and Oswego County who chose Ground Force Property Services (that’s my company!) for their paver installations.
These stories highlight not just the quality of the pavers, but also our craftsmanship, professionalism, and attention to detail.
I’m proud of being a local business owner and a veteran, but I’m even prouder of the reputation we’ve built through happy customers.
(Please note: Some names have been changed for privacy, but the stories reflect real projects and feedback.)
1. The Liverpool Front Entrance Transformation
Project: Front walkway and entryway with paver steps and porch overlay.
Location: Liverpool, NY (Onondaga County)
The Challenge: John and Mary had a typical poured concrete front walk that had cracked in several places, and their concrete stoop was spalling (flaking) from years of salt use. It was an eyesore and even a bit of a trip hazard. They wanted an upgrade that would make their home’s entrance pop with curb appeal and be safe during the winter.
Our Solution: We proposed removing the old concrete walk and installing a new paver walkway from the driveway to the porch, complete with gentle curves to add character. For the porch and steps, we suggested a paver overlay system – essentially, we veneered the existing porch and step structure with thin pavers and matching stone risers, saving them the cost of tearing it out entirely. They chose a beautiful Autumn blend color paver that complemented their brick facade, with a charcoal border for contrast.
Result: The transformation was night and day. The warm tones of the pavers made the whole front of the house more inviting. We also added low-voltage LED lights in the steps for both ambiance and safety at night. Mary left us a glowing review, saying:
“Ed and his Ground Force team took our drab, cracked front path and turned it into a magazine-worthy entrance. We’ve literally had neighbors stop by to compliment the new look. The craftsmanship on the steps and the way they blended it with our porch is top-notch. This past winter, shoveling was a breeze and we had no slippery spots like before. We feel so proud every time we walk up to our door now!” – Mary L., Liverpool, NY
From a veteran’s perspective, I also loved that John, an Air Force veteran himself, chose our veteran-owned business. We chatted about service days and there was a mutual understanding of dedication to the mission – in this case, the mission of making their home look amazing. That project finished on schedule and John joked that I run my crew “with military precision,” which I took as a big compliment!
2. Backyard Paradise in Baldwinsville
Project: Large backyard paver patio with a custom fire pit and seating wall.
Location: Baldwinsville, NY (Onondaga County)
The Dream: Lisa and Mark had a decent-sized backyard that was mostly just grass. They dreamed of an outdoor entertaining area where they could host friends and family – something like a patio with a fire pit, maybe even an outdoor kitchen down the road. They wanted it to feel like an extension of their home, complete with cozy seating and maybe some decorative elements.
Our Creation: We designed a 500 sq ft paver patio with two levels: an upper dining area off their back sliding door, and a lower fire pit lounge area. The pavers used were a mix of medium and large sizes in a random pattern, in a color blend called “Sierra” that had terracotta and grey tones (to tie in with the colors of their house siding and existing garden stones). We built a custom fire pit in the center of the lower patio using retaining wall blocks that matched the pavers, and encircled it with a semi-circular seating wall that doubles as extra seating for guests. We also integrated a couple of stone pillars at the entrance to the patio where they might add a pergola in future.
Result: What was once an empty backyard became the family’s favorite “room.” We finished in early summer, and that Fourth of July, Lisa and Mark hosted a barbecue and christened the fire pit with s’mores for the kids. Here’s what Mark had to say in his review:
“Ground Force turned our ho-hum backyard into a paradise! Ed’s design blew us away – we didn’t even think of doing a two-level patio until he showed us the plan. Now we have a dining area AND a chill fire pit zone. The workmanship is excellent; even a year later, not a single paver has shifted (and trust me, our kids put it to the test running around). Ed’s team was super respectful of our property, and even finished ahead of schedule. We’ve increased our living space without adding a single square foot to the house – how awesome is that? If you’re on the fence about investing in a patio, take the leap. We’re so glad we did.” – Mark D., Baldwinsville, NY
This project is a personal favorite of mine too. We incorporated some thoughtful touches, like leaving space for a future outdoor kitchen (they plan to add one, and we set the base ready for it) and using polymeric sand that matched the paver color for a seamless look. Also, as a fun fact, during the project I found out Lisa’s grandfather was a WWII veteran, so we had some heartfelt conversations about service and country. It’s small-world connections like that which make our work meaningful beyond just laying stones.
3. Poolside Upgrade in Oswego
Project: Renovation of an aging pool deck using slip-resistant pavers and adding a paver walkway.
Location: Oswego, NY (Oswego County)
The Issue: The Thompson family has an in-ground pool that’s about 15 years old. The original pool deck was plain broom-finished concrete which had cracked and was very slippery when wet. Given Oswego’s heavy snow, the freeze-thaw had been unkind to it. They also had no proper walkway from the pool to their back door – just worn grass. They wanted a safer, more attractive pool area where they wouldn’t worry about the kids (or adults) wiping out on slick concrete, and something that would add flair to their backyard.
Our Solution: We suggested demolishing the old concrete deck (it had too many cracks to just resurface) and installing permeable concrete pavers specifically designed for pool decks. The permeable aspect helps with quick drainage of pool splash and rain, meaning little to no puddling on the surface (good for safety). The paver chosen was a light beige/tan color that stays cooler underfoot (important on sunny days) and has a subtle texture for grip. We also built a curved paver walkway connecting the pool patio to the house and another to the shed. Around the pool edge, we used special coping paver pieces that are rounded for a comfortable touch when sitting on the pool edge.
Result: The new pool deck looks like something out of a resort brochure. It totally uplifted their backyard. The light color and beautiful pattern make the pool area feel larger and more inviting. And practically speaking, they noticed immediately how fast water drains – no more puddles for little Timmy to accidentally sprint through and slip. Mrs. Thompson wrote us a lovely review:
“We can’t say enough good things about Ed and his crew. Our old pool deck was an accident waiting to happen. The new paver pool deck is not only gorgeous (honestly, I feel like I’m at a fancy hotel when I step outside now), but it’s so much safer. We had a big pool party after it was done and everyone commented on how cool the pavers stayed and how there were no slippery spots at all. Ground Force also took care to slope everything so rain drains away – we’ve had no standing water issues even after heavy rain. The whole team was polite, hardworking, and very knowledgeable about what would work best for our needs. 10/10 recommend!” – Sarah T., Oswego, NY
As a bonus, that project got us another job: one of the Thompsons’ friends at the party was so impressed they hired us to do their patio in Fulton. Word of mouth is powerful, and we’re grateful for it. Also, it was fulfilling to solve a safety issue. With two young kids of my own, I empathize with wanting a safe play and swim area. Knowing we made the Thompsons’ pool more secure is as rewarding as making it beautiful.
4. Driveway and Walkway Makeover in Syracuse
Project: Replacement of an asphalt driveway with pavers, plus new front walkway and porch overlay.
Location: Syracuse (Eastwood area), NY (Onondaga County)
Background: Frank is a retired teacher and Army Reserve veteran living in Eastwood. His asphalt driveway was full of cracks and depressions, and every winter was a battle to shovel and snowblow because the uneven surface kept catching the shovel. He decided to invest in a new driveway and figured if he’s doing that, he might as well upgrade the connected front walk which was an old uneven brick path inherited from the previous owner. Frank wanted something low-maintenance and long-lasting (he joked he doesn’t want to replace this again in his lifetime), and he loved the look of pavers from seeing them in some nicer neighborhoods.
Our Plan: We tore out the old asphalt driveway completely, put in a deep, proper base, and installed concrete pavers rated for driveway use. He opted for a classic cobblestone-style paver, medium gray with charcoal border. It was a two-car driveway, about 40 feet long. We also replaced the front walkway with matching pavers (using the same gray, and integrating the border from the driveway for continuity). His concrete front steps were structurally sound, so we overlaid them with natural bluestone treads to complement the pavers (a nice mix of paver and stone).
Outcome: This project made a huge difference to the home’s curb appeal. Neighbors walking by literally stopped to watch our progress because a paver driveway is not yet common in that area, and it was striking. After completion, Frank sent me an email (and later posted a review) that said:
“I am absolutely thrilled with my new driveway and walkway. It’s been a few months now and I find myself looking out the window just to admire it. Ed’s crew worked like a well-oiled machine, and being a veteran myself, I appreciated the camaraderie and discipline I saw in them. The driveway has weathered its first snow with no issues – what a difference to shovel on a flat surface with no bumps! Several of my neighbors have come over to compliment the work and I happily tell them about Ground Force. I’m confident this investment will pay off in home value, but more importantly it just makes me happy every day. Thank you, Ed, for treating my home like it was your own.” – Frank G., Syracuse, NY
This one warmed my heart. Two vets bonding over a project, and seeing him so satisfied was awesome. It also illustrated how a paver driveway, while more investment than asphalt, can transform an ordinary house into the star of the street. Frank’s home went from one you’d pass by to one that catches your eye, all because of the new hardscape.
These are just a few highlights of the many projects we’ve completed in Onondaga and Oswego counties. Whether it’s a small porch redo or a full-blown backyard makeover, we approach each job with the same care and commitment. A common thread in the feedback we get is praise for our attention to detail and how we treat customers with respect – showing up on time, keeping them informed, and leaving the site tidy.
One reviewer on Google wrote that we “left the yard cleaner than it was before” and that they appreciated us being “courteous and professional from start to finish.” I believe that comes from my military background – I run a tight ship and instill in my team the importance of doing things right and respecting each client’s property and time.
Another success story not detailed here was a permeable paver driveway in Fulton to solve a drainage issue – that client was ecstatic that their huge puddle problem vanished after installation. And a fun one was a patio we did in Skaneateles where the homeowners wanted a specific pattern to mimic a carpet they loved; we custom cut and laid pavers to create that motif, and they were blown away at how we achieved it.
All these stories serve to show that when you invest in premium concrete pavers and hire a team like Ground Force, you’re not just getting a physical product – you’re getting an experience, peace of mind, and a final result that can truly enhance your lifestyle. We stand by our work, and our customers’ words speak to the craftsmanship and care we bring to every project.
If you’re considering a project, I hope these stories give you a sense of the possibilities and outcomes. We’d love to add your success story to our portfolio next!
The Process of Hiring Ground Force Property Services
By now, you might be envisioning your own project – perhaps a new patio for summer gatherings, or a safer front walkway before the snow flies next year. You’re likely wondering, “Okay, Ed, this sounds great, but how do I actually get the ball rolling? What’s it like to work with Ground Force Property Services?” I’m glad you asked! In this section, I’ll walk you through our process from start to finish, so you know exactly what to expect when you decide to partner with us for your concrete paver project. Transparency is key to us, and we want you to feel comfortable every step of the way, from the initial consultation to the final reveal (and beyond, with our warranty and support).
Here’s how it typically works:
Step 1: Free Consultation and Design Discussion
Every project starts with a simple conversation. When you contact Ground Force Property Services, LLC, we’ll schedule a free consultation at your convenience. I (or a member of my team) will come out to your home to meet you, check out your space, and talk about your ideas. This is a no-pressure visit – truly an idea-sharing session.
- Listening to Your Vision: First and foremost, I want to hear what you have in mind. Are you dreaming of a patio with a fire pit? Is your driveway causing headaches? Do you have a specific style you love? You can show me pictures, Pinterest boards, or just describe what you’re looking for. We’ll discuss how you plan to use the space (entertaining, relaxation, increased accessibility, etc.), because understanding usage helps shape the design.
- Site Assessment: We’ll walk the area and I’ll take notes on the layout, measurements, slope, sun exposure, existing landscaping, and any challenges (like that giant tree root or a drainage issue you mention). This helps me understand the scope and spot any potential concerns early. I might take some photos or even sketch on the spot.
- Expert Input & Ideas: Based on what you tell me, I’ll give some immediate feedback or suggestions. This could include what types of pavers might work well, layout ideas, and so on. Often, I’ll share a few design ideas right there. For instance, “What if we curved the patio this way to get around that shrub and create a nicer flow?” or “I think a border in a darker color would tie nicely with your shutters – how do you feel about that look?” I bring my years of experience to the table, but always in collaboration with your preferences.
- Material Samples: I usually have brochures or sample swatches of paver colors and styles. You can see and feel some options. If there’s something you love, great; if not, I can recommend others. Sometimes, I’ll even direct folks to a local supplier’s display or previous project nearby if they want to see a larger area of a certain paver installed. We want you to be confident in your choice of materials and design.
- Budget and Scope: We’ll also chat about budget early on. I’m very upfront with costs and can often ballpark things at the consultation based on similar projects we’ve done. If you have a target budget, let’s discuss how to maximize it. Pavers projects are scalable – maybe you start with a smaller phase and add on later, or we find a paver that gives the look you want at a price point that’s comfortable. The consultation is the time to align on expectations financially as well, so the subsequent proposal isn’t a surprise.
This initial meeting usually lasts anywhere from 30 minutes to an hour, depending on complexity and questions. My goal is for you to come away feeling “Wow, I have a clearer picture of what I want and I trust these folks know their stuff.” And for me, I gather all the info I need to move to the next step: planning your project in detail.
Step 2: Customized Design and Proposal
After our consultation, I go into planning mode. If needed, I’ll create a design sketch or blueprint for your project. For straightforward jobs like a simple walkway, this might be a basic diagram with dimensions. For more involved projects (patios with multiple areas, etc.), I might draft a scaled drawing or even a 3D rendering using design software, so you can visualize the plan.
- Design Proposal: I’ll prepare a document that outlines the proposed project. This includes the shape/layout of the paver area, any special features (steps, walls, lighting, etc.), and specifics like which paver product and color we discussed. If we talked about a couple of options (say two different paver styles), I might price both for comparison. I’ll detail the scope of work – e.g., “Remove existing sod, excavate 8 inches, install geotextile and 6 inches of compacted gravel base, 1 inch sand, lay ABC pavers in herringbone pattern, install edge restraints, polymeric sand in joints, etc.” This way you know exactly what’s included.
- Transparent Pricing: The proposal will have the cost breakdown. I strive to make this clear – you’ll see what the major components cost (materials, labor, any specific add-ons like lighting or a built-in grill if that’s part of it). We don’t believe in hidden fees. If there are any unknowns (for example, “if we find the soil is poor and need extra base, it could be X more”), I’ll note that too. Typically, we factor in most foreseeable things so the price is firm. Also, our proposals always include cleanup and disposal fees, permit (if needed) assistance, and basically turning over a finished product – no loose ends.
- Timeline: I’ll mention an estimated timeline or schedule. For example, “This project will take approximately one week of on-site work, and we’re currently booking about a month out.” If you have a particular time frame (like “I want this done before my Memorial Day party”), we’ll see if we can accommodate that and plan accordingly. We do get busy in peak season (spring/summer), so I encourage early booking when possible.
- Warranty and Terms: Our proposal also clearly states the warranty: We typically offer a warranty on our workmanship (often 2 years for settlement issues – meaning if any pavers sink or shift due to installation issues, we fix it free). The paver materials themselves usually come with a manufacturer’s limited lifetime warranty against structural failure (i.e., they won’t break under normal use). I’ll include info on that too. Additionally, any payment schedule (down payment, progress payments, final payment upon completion) is outlined so you know how it works.
- No-Pressure Review: I usually email this proposal to you (or deliver it in person if you prefer) within a few days of the consultation. Then, I give you time to review and think. I’m not a pushy salesman. I might follow up with a call or email after a few days to see if you have questions, but I respect that it’s a big decision. Feel free to ask for revisions – maybe you want to see an option without the fire pit to compare cost, or consider a different paver. We can tweak the design or scope until it’s exactly what you want.
I’ve had clients get three quotes and later tell me ours was the most detailed and clear – which I take pride in. Even if we’re not the lowest bid, people often choose Ground Force because they feel confident in our plan and appreciate the transparency. And if we are higher, I’m always happy to explain the value difference (sometimes it’s better base prep, higher grade pavers, more experience, etc.). It’s important you feel you’re getting your money’s worth.
Step 3: Scheduling and Preparation
Once you give the green light – hooray! – we move into scheduling and prep mode. We’ll agree on a start date that works for both of us. Depending on the season, there might be a lead time (in spring our schedule fills up fast, whereas in early fall we might fit you in sooner).
- Permits/HOA: If any permits are required (for example, some towns might need a permit for driveway work, or if we’re digging near utilities, etc.), we’ll handle that or guide you through it. Usually patios/walks don’t need permits, but driveways sometimes do. We also call utility mark-out services to ensure we don’t hit any lines when we dig – safety first. If you have a homeowners association, we’ll provide any documentation they need on materials or plans.
- Materials Order: We’ll order the pavers and materials in advance so they’re ready. Sometimes we have them delivered to your house a day or two before we start (so everything is on hand). Don’t be surprised seeing a pallet or two of stone arrive – that’s when it gets real! We coordinate deliveries so you’re not stuck with materials sitting too long.
- Pre-Project Communication: A few days before, I’ll reach out to confirm we’re still on schedule (weather can adjust things slightly – heavy rains might push an earlier job a day, for example). I’ll also go over any last-minute things: e.g., “Please mark your sprinkler heads for us” or “Make sure your car is out of the garage if we’re demoing the driveway on start day.” We really focus on good communication so you’re never wondering “Will they show up?” – you’ll know when and who to expect.
Step 4: Installation – Quality Work Every Step of the Way
This is where the magic happens, and frankly, the part we’re known for. Our team will arrive on the scheduled day, usually bright and early around 8 am (we’ll coordinate timing with you, especially if equipment is involved, to be courteous about noise).
- Meet the Crew: I have a small, dedicated crew of skilled workers – many of whom are also veterans or have been in the trade for years. We typically start by re-confirming the plan with you on site. Even though we have the design, I like to walk through it one more time on Day 1: “We’re removing this, patio goes from here to here, that tree stays, etc.” It ensures everyone (you and us) are 100% aligned. We’ll also establish any needs like access to water or power (for our saws, etc.) – and we’re respectful of your property (laying down plywood to protect lawn from wheelbarrows, etc., as needed).
- Site Preparation: As described earlier, we do the tear-out (if removing old material) and excavation first. We handle disposal unless otherwise arranged. Our guys work efficiently – it’s often surprising to clients how quickly we can remove an old patio or dig out an area, thanks to the right tools and teamwork. We’ll keep you updated as we hit milestones (“we’re all dug out and starting the base now”).
- Foundation Perfection: We install the base, and I’ve talked at length about how thorough we are with this. Expect to see a lot of measuring, compacting, and checking for level/slope. This stage might not look exciting, but it’s where we shine. Sometimes I’ll even have you come take a look before we move on, to explain what we did (“we’ve got 6 inches of compacted crusher run, see how water is draining that way, etc.”). I like educating clients as we go – many find it interesting.
- Laying Pavers with Precision: Then comes laying the pavers. We usually lay from one corner or along a straight edge we’ve set as a guide. It’s like assembling a giant puzzle, and my crew enjoys this part because you see the project really take shape. We cut in edges where needed with a specialized saw and use edge restraints to secure borders. Throughout, we’re checking pattern alignment, making sure joints are tight and everything looks as it should. I’m pretty picky – if something looks off, we adjust it. We also keep the site tidy, stacking cut-offs, etc., rather than turning your yard into chaos.
- Quality Checks: Once the pavers are all in, we do the joint sanding and compaction. Then I walk everything, feeling for any slight unevenness. We correct any tiny height adjustments by lifting a paver and adding a sprinkle of sand if needed. Basically, before we call it done, I ensure it meets our high standards. I treat it as if I were installing at my own house: it’s gotta be right.
- Extra Features Installation: If your project includes extras like a fire pit, seating wall, lighting, or steps, we typically build/install those toward the end of the process or concurrently if different crew members can tackle different tasks. For example, one guy might work on the fire pit blocks while others lay pavers. We schedule any electrician (for lighting) or plumber (for gas fire pit lines) if needed as well. We coordinate all that so you don’t have to.
During the project, feel free to ask questions or just watch the progress. Many homeowners tell us it’s fun to see it come together. Don’t worry if you have questions like “why is that like that?” – we’re happy to explain. You’ll probably meet my friendly dog tags jingling – I often wear them as a bit of my persona, sparking some chats about service and discipline with curious clients as they see our systematic approach.
Step 5: Final Walk-through and Clean Up
Once everything is installed and the site is cleaned up (we sweep, hose down if needed, pick up any stray debris, and haul away all waste), we do a final walk-through with you.
- Review the Work: I’ll walk the entire area with you, pointing out features and also encouraging you to inspect everything. This is the time to speak up if something isn’t as you expected. Maybe you decide you want an extra light here, or you notice a paver that’s slightly higher (usually not the case, but we want you 100% satisfied). We’ll address any concerns on the spot or arrange to fix them ASAP. Our goal is that you are thrilled with the outcome. I love seeing the delight on customers’ faces at this stage – it makes all the hard work worthwhile.
- Care & Maintenance Info: I’ll give you tips on caring for your new pavers. The good news, as you know, is it’s minimal. But I’ll mention things like “if you ever spill oil from the grill, clean it sooner than later” or “here’s how to hose it down” or how to properly shovel in winter (basically, you can treat it like any driveway, but avoid metal blades that could scratch a top coat if you got one). If we used polymeric sand, I might advise keeping any pressure washing at a low angle so you don’t dislodge it. Little things like that. I also often suggest saving a few leftover pavers (which we usually leave with you) in case you need them for a future replacement or expansion.
- Warranty & Follow-up: I’ll remind you of our warranty terms – essentially, if you see any issues like settling or unexpected problems, give us a call and we’ll make it right. We stand by our work wholeheartedly. In fact, I often schedule a follow-up call or visit a few months down the line (often after the first winter) to check in. I might say, “Hey, how did everything fare over the winter? Notice anything we should adjust?” Almost always the answer is “It’s perfect!”, but on the rare occasion a little area settled (maybe over a new trench or something), we promptly come and fix it. We want you as a customer for life, and that means service after the sale.
- Final Payment & Thank You: We handle any final paperwork and payment. Usually, we take a final payment once you’re satisfied. We accept various forms (check, etc., we’ll have discussed that). But the last step is really us thanking you for trusting us with your home. I often hand over a little thank-you packet – perhaps some care tips printed out, our business card to pass to friends, and sometimes a small token (I once gave a client an American flag to hang by their new porch, since we learned during the project that theirs was tattered – as a veteran, that was meaningful to me to replace it for them). We truly appreciate your business, and we love when customers feel comfortable referring us or calling for future projects.
Working with Ground Force Property Services, LLC is meant to be a smooth and reassuring experience. We take the stress out of it for you. As Ed (hi, that’s me), I take personal accountability for everything that happens on your project – you’re not dealing with a faceless company or a salesman you never see again. I’m there to ensure quality and satisfaction. We blend professional expertise with a personal touch, and that’s something our clients often note in their reviews.
From the first phone call to the last paver placed, we’ve got a battle plan for success (couldn’t resist a little military metaphor!). And that plan’s ultimate objective is to deliver you a beautiful, lasting paver installation that exceeds your expectations.
Now that you know how the process works, all that’s left is to reach out and get that consultation scheduled. Spoiler: that’s exactly what I’ll encourage you to do in the next section – the call to action. Let’s wrap this up by talking about the next steps you can take to make your dream project a reality.
Ready to Transform Your Home? Contact Ground Force Today!
Your outdoor oasis or curb appeal upgrade is within reach – all it takes is the first step. If you’re a homeowner in Onondaga County or Oswego County, NY, and you’re excited by the prospect of enhancing your property with premium concrete pavers, I invite you to take action now. As the owner of Ground Force Property Services, LLC (and a neighbor who cares about our community), I’m here to help make your vision come true with quality, honesty, and a personal touch.
Why wait? Life’s too short for boring backyards and hazardous walkways. Whether you want a stunning patio for summer barbecues in Syracuse, a safe and stylish driveway in Oswego, or a cozy fire pit area in Baldwinsville, my team and I are ready to deliver top-tier results. We’ve covered in this guide why pavers are the best choice – now let us show you what we can do for you.
Getting started is easy and risk-free:
- Call us at 315-461-7747 for a friendly chat. You’ll likely reach me, Ed, directly. We can talk through your ideas and set up a convenient time to meet.
- Request estimate here https://groundforce315.com/contact/ learn more about our services and see photos of our work. There’s an easy contact form there as well.Plus, you can read additional reviews from satisfied customers – their words speak volumes about our commitment to quality.
Remember, our initial consultation and quote are completely free. There’s no obligation, no high-pressure sales tactics – just an honest assessment and a fair quote for your consideration.
We’ll give you professional guidance tailored to our Central NY conditions and your specific needs. Even if you’re just in the “thinking about it” stage, it can be super helpful to get an expert’s eyes on your project early.
I’ve often provided ideas that clients found invaluable, whether or not they immediately moved forward.
A few things to consider as you make the call:
- Seasonal Scheduling: Our calendar can fill up quickly, especially in spring and summer. If you want your project done by a certain time (maybe a new patio by Fourth of July, or a new driveway before winter sets in), reaching out early ensures we can accommodate you. We do projects until the ground freezes, and start up as soon as it thaws, so fall and early spring are also great times to get on the schedule.
- Financing Options: We understand a paver project is an investment. If you’re concerned about budget, talk to us. We can discuss phasing the project or suggest solutions to meet your budget. Also, we can point you towards financing options if needed (some customers use home improvement loans or financing programs to spread out the cost while enjoying the benefits now).
- No Project Too Big or Small: Don’t shy away because you think your project might be “too small” for us. We handle everything from a single set of front steps to a full property hardscape overhaul. And if it’s “big”? We have the resources and contacts to scale up as needed, while still giving you personal attention. As a veteran, I love a challenge and strategic planning – large projects get me fired up, and small ones let me focus on the fine details; either way, we’re in our element.
- Support a Local Veteran-Owned Business: By choosing Ground Force, you’re supporting a local veteran-owned and operated company. I bring the values of integrity, respect, and hard work from my Army days to every job we do. We’re not a franchise or out-of-town outfit – we’re your neighbors. We take pride in beautifying our community one project at a time and building relationships along the way. Your support helps us continue to provide employment to skilled local craftsmen and, occasionally, to give back (we sometimes do community service projects or veteran-related charitable work as a way to pay our blessings forward).
I truly believe that investing in your home’s outdoor spaces with quality pavers will bring you joy (and likely increase your home’s value too).
It’s not just about the stones in the ground – it’s about creating a space where memories will be made: summer cookouts, kids’ playdates on the patio, chatting with neighbors along a new walkway, or simply enjoying a quiet cup of coffee on your elegant porch.
I want that for you, and I’d be honored if you let Ground Force be the team to make it happen.
So, are you ready to take the next step? Pick up the phone or send us a message today.
Let’s turn those ideas in your head into a tangible plan and then into a gorgeous reality. Consultation spots fill up fast as the home improvement season kicks in, so don’t miss out on the opportunity to get the best paver contractor in the area on your side (hint hint: that’s us!).
On behalf of my dedicated crew and myself, thank you for reading this guide and considering us for your project. We look forward to hearing from you and hopefully adding your story to our ever-growing list of happy customers who are enjoying their premium paver installations right now.
Your home could be the next showcase in our portfolio!
Contact Ground Force Property Services, LLC today – and let’s build something beautiful together.
(Ed – Owner, Ground Force Property Services, LLC, U.S. Army Combat Veteran)

